Androidアプリケーションの開発 【03:GPS位置情報取得アプリ】
GPSを利用した簡単な位置情報取得アプリの作成
GPSを起動して簡単に位置情報を取得するアプリを作成してみます。
Androidエミュレーターでのみ動作確認を前提に以下の条件で作成します。
- 詳細な権限(パーミッション)チェック処理は省略する。
- 位置情報のバックグランドでの記録保持は無し。
目次
パーミッションの設定
位置情報関連の権限は、FineとCoarseの2種類です。
AndroidManifestに以下の設定をします。
[/text]
- Fine : GPSデバイスを使った精度が高い位置情報を取得します。
- Corse : ネットワークを使って、GPSが使えない屋内やビルの谷間などで大まかな位置情報を取得します。
パーミッションのチェック
Fine か Corseのいずれかのパーミッションが得られているかチェックします。
パーミッションのチェックが許可されない例外は、あまり考えないで実装します。
if (ContextCompat.checkSelfPermission(this,
        Manifest.permission.ACCESS_FINE_LOCATION) !=
        PackageManager.PERMISSION_GRANTED &&
    ContextCompat.checkSelfPermission(this,
        Manifest.permission.ACCESS_COARSE_LOCATION) !=
        PackageManager.PERMISSION_GRANTED) {
    ActivityCompat.requestPermissions(this,
            new String[]{Manifest.permission.ACCESS_FINE_LOCATION,Manifest.permission.ACCESS_COARSE_LOCATION},
            1000);
    return;
}
パーミッションチェックのリクエスト結果を受け取ります。
@Override
public void onRequestPermissionsResult(
        int requestCode, @NonNull String[] permissions, @NonNull int[] grantResults) {
    if (requestCode == 1000) {
        // 使用が許可された
        if (grantResults[0] == PackageManager.PERMISSION_GRANTED) {
            // 位置測定を始めるコードへ
            locationStart();
        }
    }
}
LocationManagerのインスタンス生成
位置情報を管理している LocationMnager のインスタンスを生成します。
LocationManager=(locationManager)LOCATION_SERVICE;
リスナーの登録
Activityに LocationListener を登録します。
public class MainActivity extends AppCompatActivity implements LocationListener {
位置情報のアップデート
LocationManagerからrequestLocationUpdatesを使って位置情報をアップデートするメソッドを呼び出します。
locationManager.requestLocationUpdates(String,long minTime, float minDistance, LocationListener listener);
- String provider:GPSを使う場合は LocationManager.GPS_PROVIDER、ネットワークの場合は LocationManager.NETWORK_PROVIDE を設定します。
- long minTime:最小時間間隔[msec]、消費電力に大きく関係します。
- float minDistance:最小距離間隔[m]、アップデートでの最小距離です。
- LocationListener listener:登録したリスナーです。
位置情報の通知
位置情報が通知されるごとにonLocationChangedにてgetLatitude()とgetLongitude()を使って緯度経度を取得します。
@Override
public void onLocationChanged(Location location) {
    // 緯度の表示
    TextView textView1 = (TextView) findViewById(R.id.text_view1);
    String str1 = "Latitude:"+location.getLatitude();
    textView1.setText(str1);
    // 経度の表示
    TextView textView2 = (TextView) findViewById(R.id.text_view2);
    String str2 = "Longtude:"+location.getLongitude();
    textView2.setText(str2);
}
まとめると以下のようになります。
MainActivity.java
package com.example.testappgps;

import android.Manifest;
import android.content.Intent;
import android.content.pm.PackageManager;
import android.location.Location;
import android.location.LocationListener;
import android.location.LocationManager;
import android.provider.Settings;
import android.support.annotation.NonNull;
import android.support.v4.app.ActivityCompat;
import android.support.v4.content.ContextCompat;
import android.support.v7.app.AppCompatActivity;
import android.os.Bundle;
import android.util.Log;
import android.widget.TextView;
import android.location.LocationProvider;

public class MainActivity extends AppCompatActivity implements LocationListener {

    LocationManager locationManager;

    @Override
    protected void onCreate(Bundle savedInstanceState) {
        super.onCreate(savedInstanceState);
        setContentView(R.layout.activity_main);

        if (ContextCompat.checkSelfPermission(this,
                Manifest.permission.ACCESS_FINE_LOCATION) !=
                PackageManager.PERMISSION_GRANTED &&
            ContextCompat.checkSelfPermission(this,
                Manifest.permission.ACCESS_COARSE_LOCATION) !=
                PackageManager.PERMISSION_GRANTED) {
            ActivityCompat.requestPermissions(this,
                    new String[]{Manifest.permission.ACCESS_FINE_LOCATION,Manifest.permission.ACCESS_COARSE_LOCATION},
                    1000);
        }
        else{
            locationStart();

            locationManager.requestLocationUpdates(LocationManager.GPS_PROVIDER,
                    1000, 50, this);
        }
    }

    private void locationStart(){
        // LocationManager インスタンス生成
        locationManager =
                (LocationManager) getSystemService(LOCATION_SERVICE);
        String locationProvider = null;

        // GPSが利用可能になっているかチェック
        if (locationManager != null && locationManager.isProviderEnabled(LocationManager.GPS_PROVIDER)) {
            locationProvider = LocationManager.GPS_PROVIDER;
        }
        // GPSプロバイダーが有効になっていない場合は基地局情報が利用可能になっているかをチェック
        else if (locationManager != null && locationManager.isProviderEnabled(LocationManager.NETWORK_PROVIDER)) {
            locationProvider = LocationManager.NETWORK_PROVIDER;
        }
        else {
            // GPSを設定するように促す
            Intent settingsIntent =
                    new Intent(Settings.ACTION_LOCATION_SOURCE_SETTINGS);
            startActivity(settingsIntent);
        }

        if (ContextCompat.checkSelfPermission(this,
                Manifest.permission.ACCESS_FINE_LOCATION) !=
                PackageManager.PERMISSION_GRANTED) {
            ActivityCompat.requestPermissions(this,
                    new String[]{Manifest.permission.ACCESS_FINE_LOCATION,}, 1000);
            return;
        }

        locationManager.requestLocationUpdates(LocationManager.GPS_PROVIDER,
                1000, 50, this);
    }

    @Override
    public void onRequestPermissionsResult(
            int requestCode, @NonNull String[] permissions, @NonNull int[] grantResults) {
        if (requestCode == 1000) {
            // 使用が許可された
            if (grantResults[0] == PackageManager.PERMISSION_GRANTED) {
                // 位置測定を始めるコードへ跳ぶ
                locationStart();
            }
        }
    }

    @Override
    public void onStatusChanged(String provider, int status, Bundle extras) {
        switch (status) {
            case LocationProvider.AVAILABLE:
                break;
            case LocationProvider.OUT_OF_SERVICE:
                break;
            case LocationProvider.TEMPORARILY_UNAVAILABLE:
                break;
        }
    }

    @Override
    public void onLocationChanged(Location location) {
        // 緯度の表示
        TextView textView1 = (TextView) findViewById(R.id.text_view1);
        String str1 = "Latitude:"+location.getLatitude();
        textView1.setText(str1);

        // 経度の表示
        TextView textView2 = (TextView) findViewById(R.id.text_view2);
        String str2 = "Longtude:"+location.getLongitude();
        textView2.setText(str2);
    }

    @Override
    public void onProviderEnabled(String provider) {
    }

    @Override
    public void onProviderDisabled(String provider) {
    }
}
AndroidManifest.xml
<?xml version="1.0" encoding="utf-8"?>
<manifest xmlns:android="http://schemas.android.com/apk/res/android"
    package="com.example.testappgps">

    <uses-permission android:name="android.permission.ACCESS_FINE_LOCATION" />
    <uses-permission android:name="android.permission.ACCESS_COARSE_LOCATION"/>

    <application
        android:allowBackup="true"
        android:icon="@mipmap/ic_launcher"
        android:label="@string/app_name"
        android:roundIcon="@mipmap/ic_launcher_round"
        android:supportsRtl="true"
        android:theme="@style/AppTheme">
        <activity android:name=".MainActivity">
            <intent-filter>
                <action android:name="android.intent.action.MAIN" />

                <category android:name="android.intent.category.LAUNCHER" />
            </intent-filter>
        </activity>
    </application>

</manifest>
レイアウトは、緯度・経度を表示するだけです。
activity_main.xml
<?xml version="1.0" encoding="utf-8"?>
<android.support.constraint.ConstraintLayout xmlns:android="http://schemas.android.com/apk/res/android"
    xmlns:app="http://schemas.android.com/apk/res-auto"
    xmlns:tools="http://schemas.android.com/tools"
    android:layout_width="match_parent"
    android:layout_height="match_parent"
    tools:context=".MainActivity">

    <TextView
        android:id="@+id/text_view1"
        android:layout_width="wrap_content"
        android:layout_height="wrap_content"
        android:layout_margin="20dp"
        android:textColor="#44f"
        android:textSize="20sp"
        app:layout_constraintBottom_toBottomOf="parent"
        app:layout_constraintHorizontal_bias="0.501"
        app:layout_constraintLeft_toLeftOf="parent"
        app:layout_constraintRight_toRightOf="parent"
        app:layout_constraintTop_toTopOf="parent"
        app:layout_constraintVertical_bias="0.1" />

    <TextView
        android:id="@+id/text_view2"
        android:layout_width="wrap_content"
        android:layout_height="wrap_content"
        android:textSize="20sp"
        android:textColor="#f44"
        android:layout_margin="20dp"
        app:layout_constraintBottom_toBottomOf="parent"
        app:layout_constraintHorizontal_bias="0.501"
        app:layout_constraintLeft_toLeftOf="parent"
        app:layout_constraintRight_toRightOf="parent"
        app:layout_constraintTop_toTopOf="parent"
        app:layout_constraintVertical_bias="0.2" />

</android.support.constraint.ConstraintLayout>
アプリケーションの実行
エミュレータを起動して、アプリを実行します。
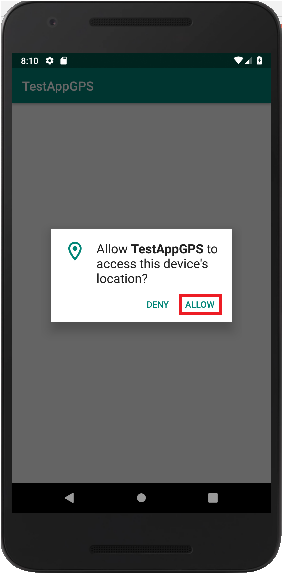
パーミッションの確認ダイアログが表示されるので許可します。
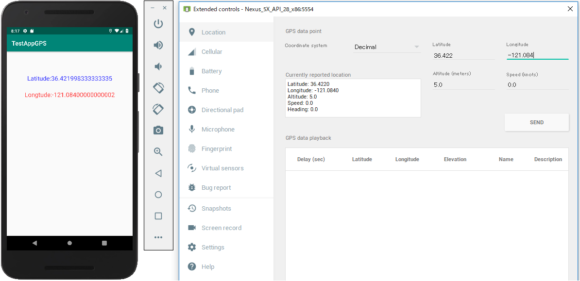
エミュレータの右下にあるMore「…」をクリックしてExtended controlsを開きます。
「Location」のタグから「latitude」「longitude」に数値を設定して「SEND」をクリックすると、アプリに緯度経度が表示されます。